In the current digital environment, where everything happens fast and goes viral, it is not a lucky chance to shoot a video that will have an audience; it is more about what tools you need to use to tell a good story, make the visuals better, and retain people until the end. CapCut Desktop excels there. Whether it is creators and influencers, educators, or business owners, CapCut offers an elegant, AI-augmented platform that transforms rawness into high-performance material immediately viewable on TikTok, YouTube, and Instagram.

Creating professional-looking videos is not a task for a professional editor, thanks to smart features such as an AI voice generator, auto captions, effects, and single-click improvements.
Why Use CapCut Desktop for Viral Video Creation?
As compared to most online editors or mobile-first platforms, CapCut Desktop Video Editor is created with creators in mind who would like to have more control and better editing features in a single interface. It provides:
- A multi-layered timeline for detailed editing
- Built-in sound effects, filters, and transitions
- AI-powered features for voiceovers, upscaling, and captions
- Export options tailored to different platforms and aspect ratios
All of the above make CapCut a beast when it comes to recycling unedited, shaky, or unpolished footage into something ready to make viewers take notice and stay tuned.
Step-by-Step: Turning Raw Footage into Viral Content with CapCut Desktop
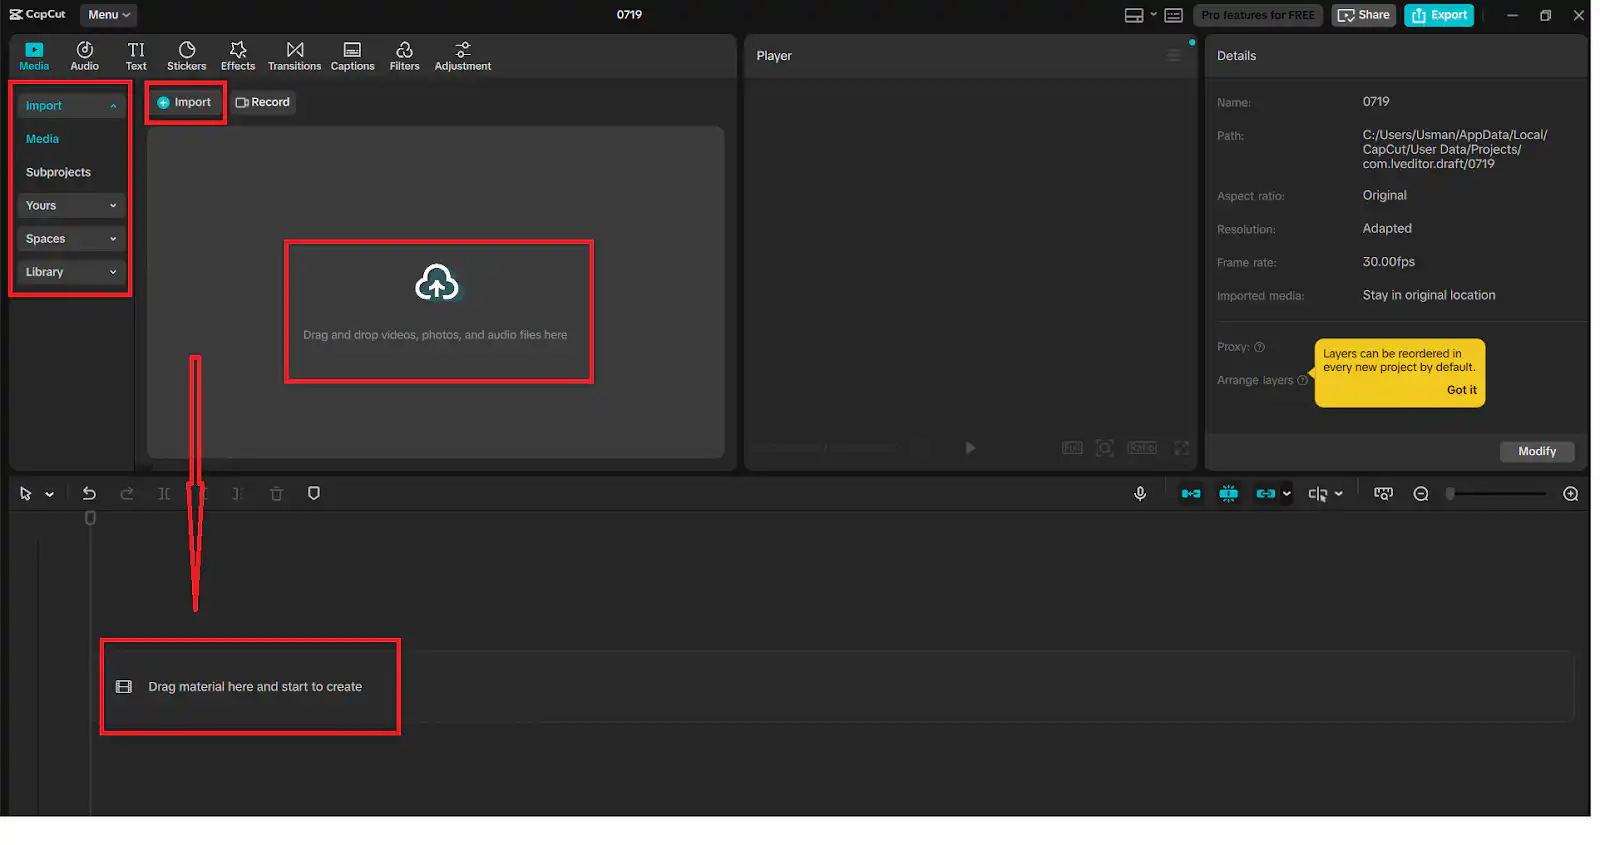
1. Import and Organize Your Raw Footage
You can start by opening CapCut Desktop and creating a new project. The ingestion of your raw videos, B-roll, audio clips, and images should be taken through the use of the “Import” button. Drop your main video in the timeline and apply the split and delete feature to cut unwanted parts.
The interface of CapCut has a feature of creating folders and marking clips with labels, which comes in handy when dealing with longer tapes or take collection. Up front organization decreases clutter, and editing becomes faster.
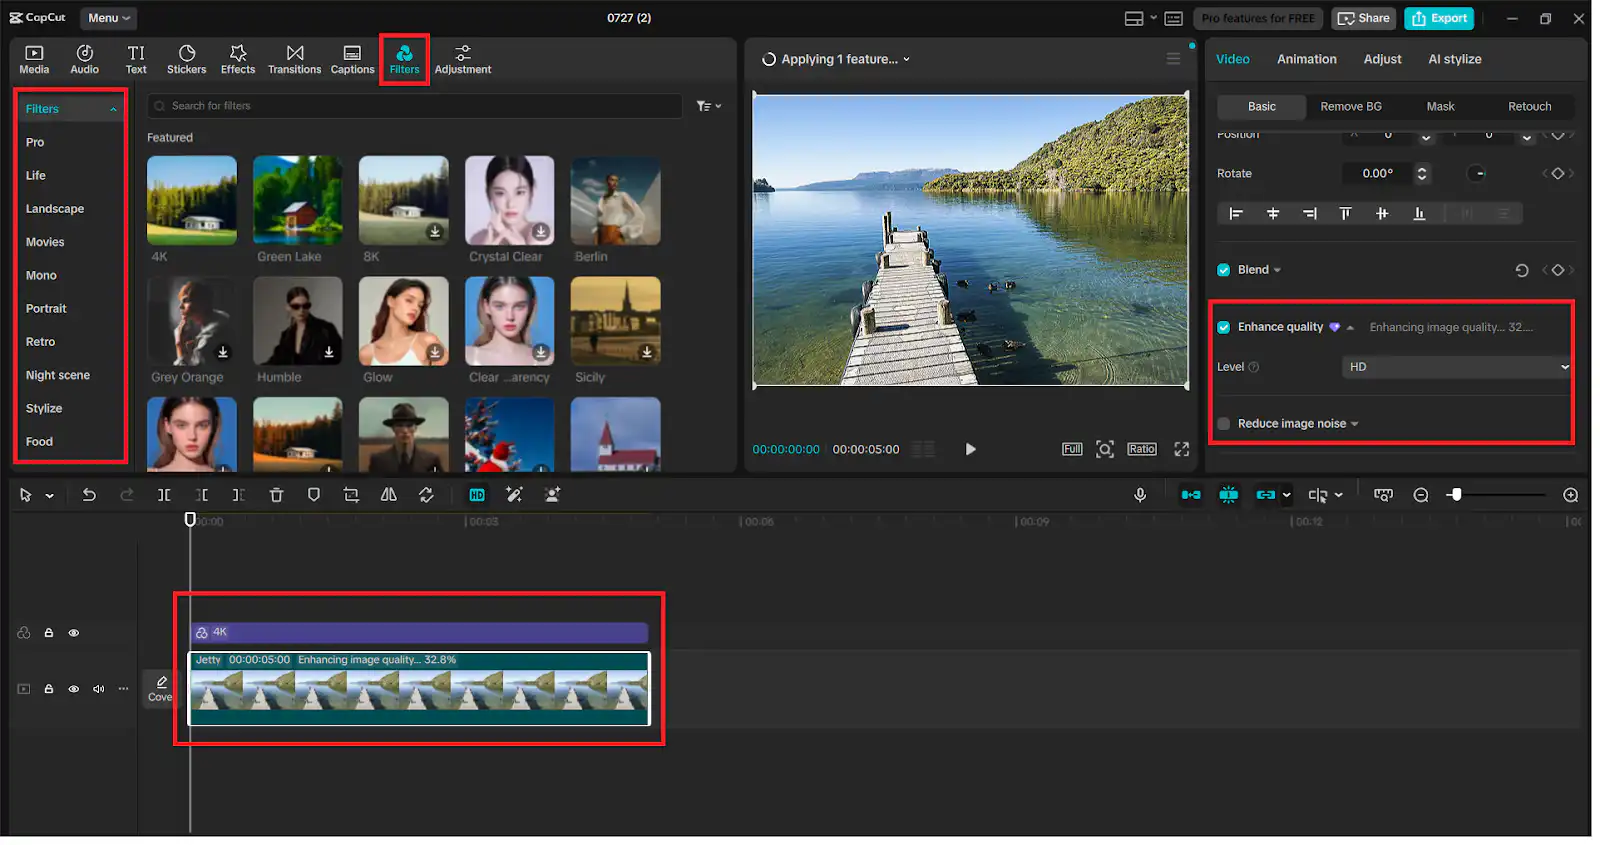
2. Clean Up Visuals with Filters and Enhance Quality Tool
In order to render your video clean and interesting, click on your clip in the timeline and head to the “Filters” or “Adjust” tab. In this, there are possibilities to adjust the brightness, saturation, contrast, and apply cinematic filters.
Then, use the enhancement of the image in CapCut to make videos dull or low-light. This is particularly good to use with outdoor shots or screen recordings. Whether you begin with vintage footage or mobile video, you will be overjoyed with the built-in AI video upscaler – a software that will sharpen video resolution and clarity to make it much sharper and professional.
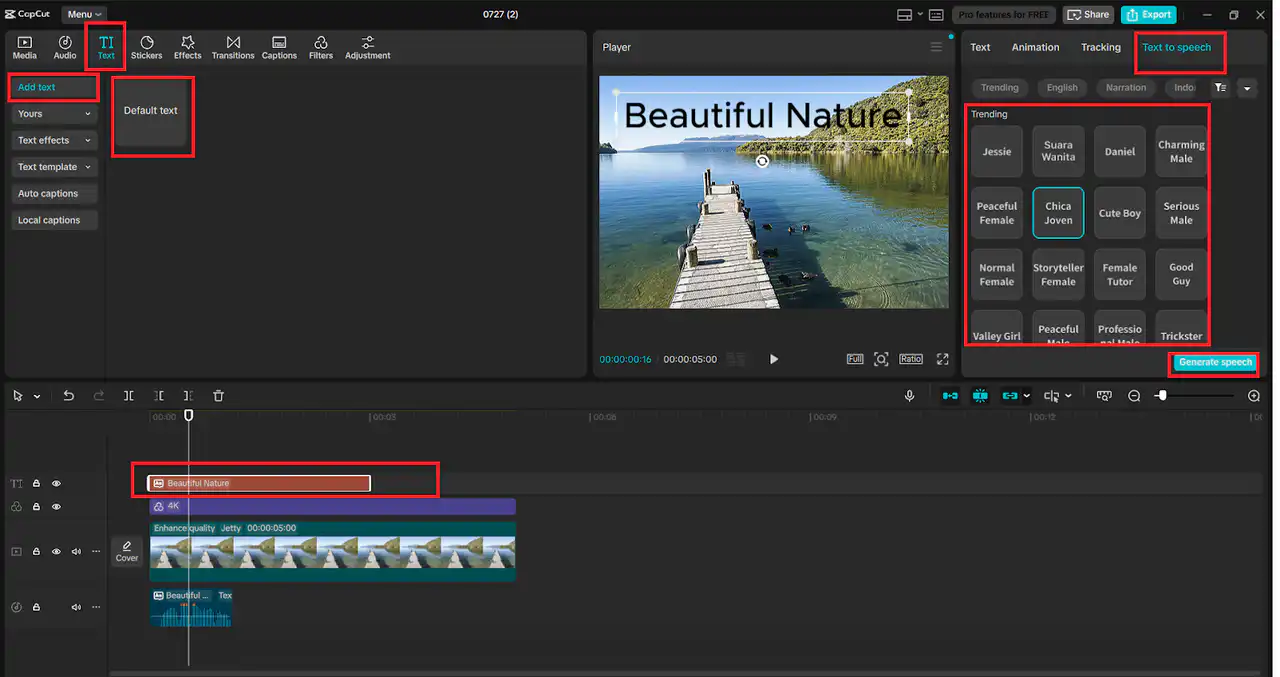
3. Add a Voiceover Using an AI Voice Generator
A compelling voiceover can help your video go viral by improving storytelling and emotional engagement. Instead of recording your own audio, go to “Text” > “Text to speech” and paste your script. Select from various voice styles, languages, and tones using the AI voice generator feature.
This function is perfect for those who are camera-shy or want to produce content faster. Whether you’re narrating a tutorial, listicle, or commentary, the voice generator helps you maintain a consistent and polished audio style.
4. Insert Captions and Effects for Higher Engagement
Not only do captions make your content more accessible, but they also have a better performance in terms of social networking. In CapCut, it is just as easy as clicking the button that says “Auto captions” and choosing the language that is spoken. Your voiceover or audio will be transcribed in the form of timed subtitles by the tool.
The text, background, and font can be adjusted to make them visible. In case of the viral content, apply stickers, GIFs, and movement effects (that can be located in the section of effects and animations) to make your video visually appealing. The fluidistic images assist in retaining attention during the initial few seconds, which is essential to TikTok and Instagram Reels.

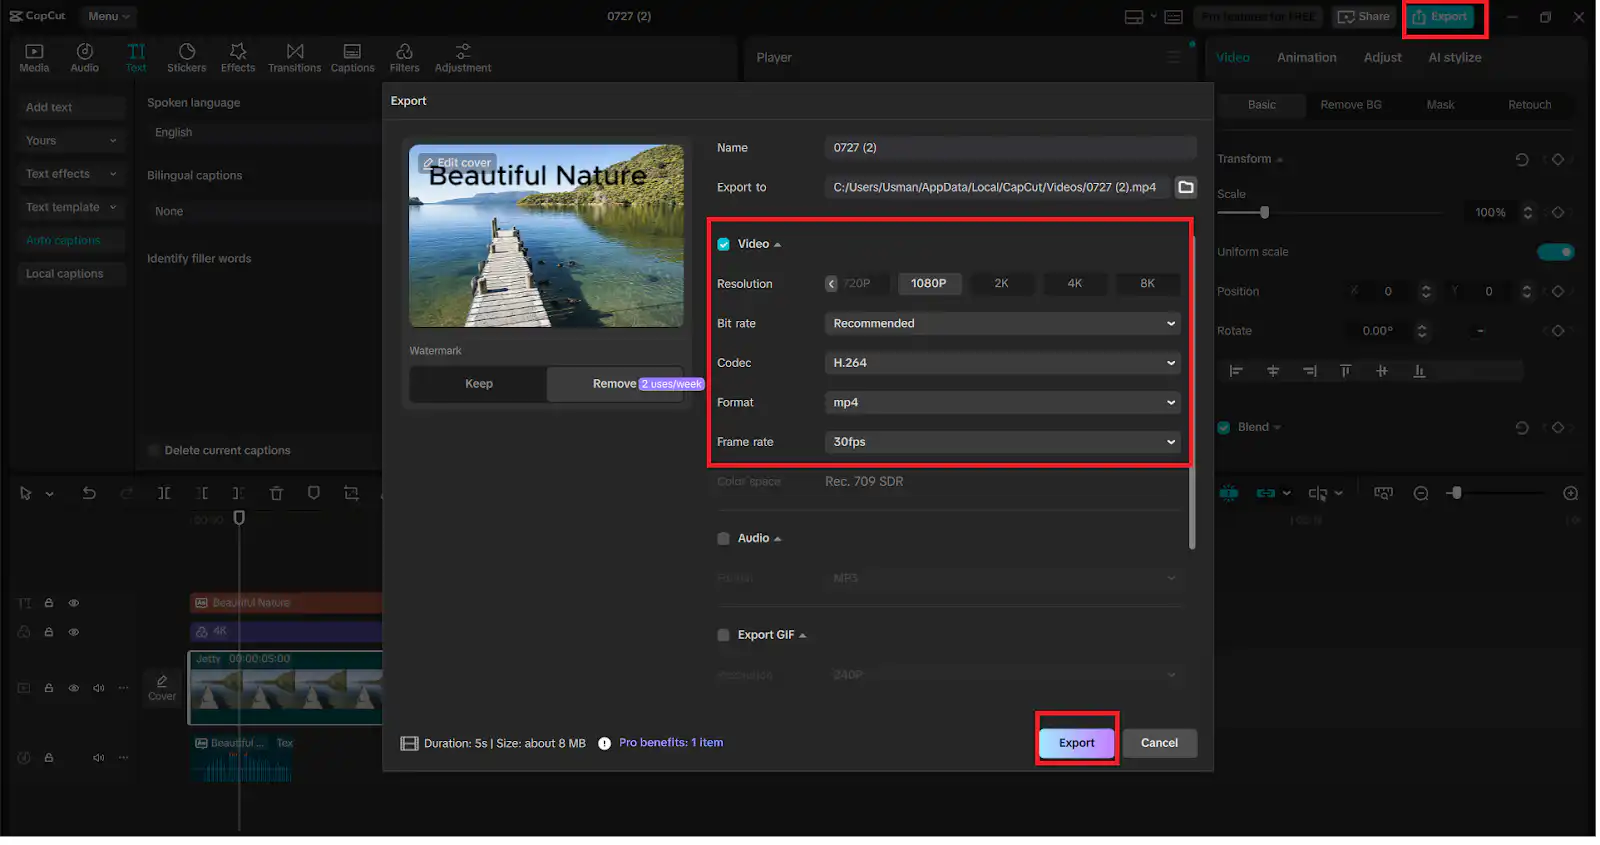
5. Final Polish: Add Transitions, Music & Export
Lastly, smooth your video and make it shareable. Insert between-scene transitions by hovering the mouse between two clips and then clicking the “Transitions” button; options include cinematic and playful styles. Then, visit the tab of “Audio” tab to insert background music, sounds, or popular audio clips.
Enhance the CapCut built-in AI text-to-speech once more by making quick adjustments or having a multilingual voice-over. After this, just press the “Export” option and select the resolution (720p, 1080p, 4K), format (MP4, MOV), and aspect ratio based on the place you are going to share it (YouTube (16:9), TikTok (9:16), or Instagram (1:1 or 4:5).
Final Thoughts
Viral content isn’t just about great ideas—it’s also about sharp execution. CapCut Desktop allows you to edit faster, smarter, and better. Whether you’re sharing a tutorial, commentary, vlog, or promo clip, tools like the AI voice generator, text-to-speech AI, and AI video upscaler give you the edge you need to compete in today’s saturated digital space.
Turn your raw clips into scroll-stopping videos. With CapCut, going viral is no longer a mystery—it’s just a few smart steps away.
If you want to submit your articles and/or research papers, please visit the Submissions page.
To stay updated with the latest jobs, CSS news, internships, scholarships, and current affairs articles, join our Community Forum!
The views and opinions expressed in this article/paper are the author’s own and do not necessarily reflect the editorial position of Paradigm Shift.